Saturday, January 31, 2009

Lilo & Stitch..

This is a sketch that I did 2 years ago. Just want to share it with you guys.


Material (s) Used: Pencil, paper
Tool (s) Used: Lumix Camera

Friday, January 23, 2009

Happy Chinese New Year...

Happy Chinese New Year to all......Will be updating my blog after CNY..

The Potato Couch Workout cont.

Hi..Part 3 of Potato Couch illustration. I have added a pant for my Mr Potato Couch. This is Yogi's idea to put it as a pocka dot pants...:P
Today I have been browsing around the whole day. Finding inspirations, ideas & most of all goals to get me going...I have a new goal today. I wanted to work for Warner Bros one day...hehe. Because of that, I have make up my mind to study on illustration for two solid hour everyday...mainly practicing & improving my skills so that one day I can be proud of myself.

I saw a site with nice illustration..I wanted to be just like him one day.

Thursday, January 22, 2009

Headers for Beauty Blogs

This is what I have been playing around today. Some blog header design. The headers below are created using Adobe Illustrator CS3. All the pretty girls down there are firstly drawn on paper before I actually captured the image using a camera. After that as usual, I outlined the whole illustration again using a Pen tool in Illustrator. Then, the same process to colored the whole illustration take place. After all those hard work you will actually get the results you have always wanted.

It is not that easy to generate idea all at one time. So, is normal for you to create something not that nice at the first place then slowly working to improve it bit by bit as your inspiration & creativity comes along....So keep on trying & trying whenever you feel stress or losing out of idea.Italic

Beauty Blog Header

Material (s) Used: Paper, pencil
Tool (s) Used: Lumix Camera, Adobe Illustrator CS3

Wednesday, January 21, 2009

The Potato Couch Workout cont.

My potato character don't seems to stands out...so I did a new one today. Here is the new character.

A fun & friendly Potato Character

What do you think of my new design?


Material (s) Used: Paper, pencil
Tool (s) Used: Lumix Camera, Adobe Illustrator CS3

Tuesday, January 20, 2009

The Potato Couch Workout

Hi.. It has been quite a while since I last entered a contest in 99Designs.com. Today, I'm quite proud of myself. I actually completed 1 design for the Potato Couch Workout contest. It is actually a series of card that the contest holder wanted to do. The winner got the chance to designs the whole series of the card.

First, I take a photograph of the design drawn (another option if you don't have a scanner). Then, I used Adobe Illustrator to redraw the outline. I have actually tried in with Adobe Photoshop as well however, there are certain criterias that made me choose Adobe Illustrator at the end. After that, I color the design. Finally, put down some shadows on the design to make the character looks more realistic.

For your information, you can either use Adobe Illustrator or Adobe Photoshop to color your t illustration. It is really up to you. Both of the softwares are almost the same but not quite. The way you do something in Illustrator is different compare to Photoshop. You can play around with both of the tools & see which one really suits you.

This is the potato character I come up with.


This is the final product after, 5 hours of hard work. What do you think? I have always wanted to become a hardcore illustrator. I envy those who really good at it. This is all my hard work after trying & trying few times. I always wanted to know how some of the illustrators can have a smooth texture on the illustrations they did. Always post those questions to them whenever I saw a nice illustration either in a blog or youtube or devianart. But, no one seems to answer to any of my questions. My friend said every successful illustrator have their own secret that they won't really want to share with others. So, I have no other choice but experience it by myself...


Material (s) Used: Paper, pencil
Tool (s) Used: Lumix Camera, Adobe Illustrator CS3

Saturday, January 17, 2009

Angels

Do you guys believe in angels? I do. I believe in magical creatures such as mermaids, angels, fairies, gnomes & etc. I love reading stories about anything magical. I might be too old to be reading fairytales or things like that however, sometimes is nice to know that there is something magical happens around you. It might not need to be real. But, when you come to think about it, it might be exciting & thrilling at the same time.

I love angels...I believe each of us have our own angel looking & guiding after us. They are there right beside us looking over our shoulder. And when time comes, they will use their magical power on us.

I drew a few angels last month. I love the process of drawing the wings. If I draw fairies, I will concentrate more on the wings as well. I tried to make them as pretty & magical as possible.


My Angels Collection


Water Angel


Fire Angel


Earth Angel

Material (s) Used: Paper, pencil, Copic markers
Tool (s) Used: Lumix Camera

Friday, January 16, 2009

My Old Sketch

Hi all...It has been quite a while since I last blog. I was having chicken pox since last Sunday...huhu. Now, my whole face is full of pock marks. It is extremely ugly...

This sketch I did long time back, 2 years back...I was digging to see what I can show here & I found this...Hope you guys will like it. This was a gift to JD.

As what you guys can see down here, a girl & a boy is tied together in a garden. Tied by fate...hehe


Material (s) Used: Paper, pencil, crayon
Tool (s) Used: Lumix camera

Thursday, January 8, 2009

Handmade 'Take Care' Card for Swee Ling

Part 1- The Card
***********************************************************************************

Hi all. Here is the handmade 'Take Care' Card for Swee Ling. This time I have used a mailbox shape as a card. First of all, I cut out 3 rectangulars from the card. Then, I glued the darker red paper on the card as well as the purple color tag. After that, I glued the owl & a girl on it. Finally, some touch up on the card by drawing some flowers on the darker red paper.

The front view of the Card


Upclose of the owl & girl image


Below here are the inside of the card. Some sketch of a bus stop served as the background of the girl that will make the girl stands out more.


Upclose of the girl & bus stop sketches


Part 2 - The Moment
************************************************************************************
Now is the card giving ceremony. Wow..sounds tremendously rocks. I got to hand over my handmade card to her. I guessed I'm more happy than her is something like Christmas giving spirit I have here...hehe :P

Swee Ling, me & her Card

Material (s) Used: Pencil, paper, Copic markers, color pencils, Pilot G-1 pen, ribbons, lots of color papers
Tool (s) Used: Lumix Camera

Wednesday, January 7, 2009

Handmade 'Take Care' Card for Abi & Yogi

Part 1 - Idea's Generation ***********************************************************************************
My friends, Yogi & Abi will be going to Bangalore this Sat. I feel very sad. I won't have anyone to chat & disturb for 3 months..what a torture. I have made these cards for both of them. I spent approximately 1 day doing it.

These cards are easy to make. What you need is get a couple of ideas & send them running. I have drew a few images that I wanted to use in my cards. Then, starts get crazy sticking & gluing things on the card. Not to forget, choose the color of the cards that you want to work on.
No limits, no boundaries just do what you feel like doing until you have expressed on the ideas you have in your mind. Get some ribbons & gold dust if you want to put them in as well.

Part 2 - Gluing, Pasting & Have Fun
*************************************************************************************
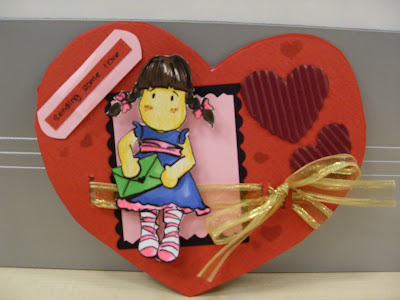
This is Yogi's card. I have made a heart shape card. First of all, before I get started, I have been searching high & low for blade. Don't have 1 that time. I poke a few rectangular holes on the card so that I can put in the ribbon (a gold ribbon actually :P) After that, I paste some paper that I have cut using my newly bought pattern scissors. Notice I have pasted some hearts on the card. Lastly, paste the girl & the 'Sending some love' tag on the left hand corner. Tada..there you have it a beautiful handmade card for your friend. Don't forget to drop a few words in the card for them...


This is the card for Abi. This card I have made it as into an envelope. First of all, I have folded the card. Then, I have pasted 2 ribbons on the card. After that, I have pasted the paper that I have cut using the pattern scissors on it. On top of the paper, I have glued a fake ribbon. Lastly, I glued the girl & flowers (made by myself) plus doodle some flowers on the card. Not to mention, scribbled a few words in the card.


Part 3 - Happy Moments
*************************************************************************************
This is my friends reaction when they received the cards...happy I guess. Actually is not a guess, they were actually happy. You can see it on their face. Me too were happy. Sometimes, when you give something that you have spent so much time making it to the people tat you planned to give, you will a lso feel that happiness surrounding you. :p


Yogi

Abi
(she posed a few times taking this photo after I told her that I will be uploading this here..)


Here are the picture of Yogi, Abi & I with their cards...Gonna miss them especially Abi coz I got to tease her. hahaha...


Material (s) Used: Pencil, paper, Copic markers, color pencils, Pilot G-1 pen, ribbons, lots of color papers
Tool (s) Used: Samsung camera (Abi's)

Supplies

This are the things that I have bought yesterday. I want to make card for my friends that was what I have been thinking that moment in Jusco. I got something hard paper for the cards. 3 different colors each. (red, maroon, brown) Brought a packet of color papers, 3 pattern scissors & ribbons.


Pattern Scissors


Color Papers


A Shoe Box


My Crayons


Treasured Shoe Box

Monday, January 5, 2009

Handmade Christmas Card cont

This is the 2nd handmade Christmas card I did. Just a slight differences between both of the cards.


DIY Flowers


The Snowman


The Card


Inside this card, I have done something very different in this card. All the image below are color using Copic markers & the snowman was drawn using color pencil.


Material (s) Used: Pencil, paper, pilot G-1 pen, Copic markers, color pencils
Tool (s) Used: Lumix camera

Sunday, January 4, 2009

Handmade Christmas Card

Hi..I did 2 cards for my friends during Christmas. I have first drawn the images of the snowman used in both of the card on the paper using pencil & later on had it outlined using pilot G-1 pen. After that, I used Copic markers as well as some color pencils on the images.


Snowman


Christmas Trees


After that, I have cut out the snowman & the tress & stick it on a color paper. I have also used some DIY flowers that I bought from the shop earlier. Below is 1 of the cards that I have made.


The Snowman


The DIY flowers


This is what I have inside the card. A santa with some wishes for the recipient.


Material (s) Used: Pencil, paper, pilot G-1 pen, Copic markers, color pencils
Tool (s) Used: Sony Ericsson hp

Will be posting the other card tommorow. :p